| ---------- | Tenstorrent Transformer Training |
| 2025-12-24 | Introduction and Background |
| 2025-12-27 | A first kernel (00_write_to_sram) |
| ---------- | Unsorted |
| 2025-04-24 | CTF Writeup: return of fzz buzz |
| 2024-11-17 | Latest reboot of the blog |
| 2024-11-16 | Using Nix Flakes and direnv to manage a dev shell for projects that don’t use Nix |
| 2020-02-08 | Pinebook Pro OSDev: Hello World |
| 2020-02-06 | The StahlDream |
| 2017-10-10 | Helpful Tools for CSCI2021 |
| ---------- | Miscellaneous |
| ????-??-?? |
~/.plan
|
| ????-??-?? | Projects I’d like to do |
Tenstorrent Transformer Training: Introduction and Background
Published: 2025-12-24I’ve been playing with training small language models as a side interest recently, and got my hands on a Tenstorrent Blackhole p150a to use instead of typical Nvidia GPUs.
So far, I’m finding the openness of their architecture impressive, but their software stack less so. Summarily, their architecture is a torus of clusters of RISC-V cores grouped around a matrix and vector FPU. As a result, the programmer writes kernels as RISC-V machine code with vendor extensions (e.g., to send instructions to the FPUs).
The primary vendor-supported interface is C++, which makes their software stack require a vendor copy of GCC. If a programmer wants to write their ML code in Python, this ends up making runtime calls to GCC, to lazily compile kernels.
For my uses, this makes the wrong trade-offs — I have a small, fixed compute budget, a lot of experience writing and optimizing assembly, and a relatively unusual set of systems I care about having excellent support for.
And hey, I’m a compilers PhD student. If this is a side interest anyway, I oughta write my own compiler instead of having to make nice with someone else’s.
I’m not smart enough to write a compiler smarter than me (just more persistent than me!), so it makes sense to do this by hand before even starting to tackle that.
The goal of this post is to walk through training a small sparse transformer on the Blackhole, with the code running on the card being written from scratch. We’ll do this incrementally, building up from very simple kernels to our final model.
I’ll also try to spell out architectural choices a bit more than I tend to see in published papers, to err on the side of reproducibility. This’ll also hopefully make it obvious if something I do helps or hurts performance a lot.
Background: Blackhole architecture
Diagrams in this section and the following one are copyright 2025, Tenstorrent AI ULC, and reproduced here under the CC BY-ND 4.0 license. They are from the tt-isa-documentation repo.
The Blackhole is a grid of “tiles” on a 2D torus. There are two networks that can be used to send requests to read or write memory from one tile to another. Each one is called a NoC (“network on a chip”). NoC 0 (the first diagram) passes requests down and to the right, NoC 1 (the second diagram) passes them up and to the left.


The different tiles have different functionality. The three kinds we mainly care about are:
-
T0–139are Tensix tiles, which are the vast majority of the compute. We’ll go over them in more detail later, since they’re what’s running our code.In brief, each tile is five RISC-V cores glued to a Tensix core; the RISC-V cores provide the Tensix core with instructions and manage the network, but the Tensix core does the computations we care about.
-
D0–7are DRAM tiles, which each provide access to 4GiB of DRAM for a total of 32GiB on the card. Each of these shows up on the network in three different places, helping to avoid contention on the network when communicating with them. -
PCIe0–1are the PCIe tiles. On the p150 (the Blackhole model we’re targeting), only the PCIe0 tile is used. We don’t need to program the PCIe tile, but all accesses from the host machine go through it.
The others are:
-
CPU0–15are the L2CPU tiles. These are four clusters of four relatively big RISC-V cores. Unlike all the other RISC-V cores on the Blackhole, these are big enough to run Linux. We don’t have any code to run on these at the moment. -
E0–13are the Ethernet tiles. The Blackhole includes four 800GbE ports, each of which is connected to two Ethernet tiles. (Four tiles are unused and two are fused off.) These can be used to let cards communicate. This post only covers using a single card, so we don’t need these tiles. -
ARCis the tile with the CPU that runs the firmware. We don’t need to program this tile directly. -
SECis the “Security” tile. This tile doesn’t seem to be documented, and the docs imply that it should be ignored.
Writes to the NoC can either have one destination or several. When writing to several tiles at once, they must all be Tensix tiles arranged in a rectangle on the surface of the torus.
Background: Tensix tile architecture
Each Tensix tile has five “baby RISC-V” cores, a Tensix core, some SRAM (called “L1”), the NoC connections, and some other resources we’ll ignore.
The RISC-V cores are not homogeneous; the five cores are named B, T0–2, and NC.
The cores implement a fairly minimal ISA — RV32IM_Zicsr_Zaamo_Zba_Zbb, plus some of Zicntr, F, and Zfh.
-
The T0–2 cores are the only cores that are fully able to communicate with the Tensix core, and each one corresponds to one thread on the Tensix core, so all three have to be used for optimum performance.
- The T0 core is typically used to instruct the Tensix core’s Unpackers to move data from L1 to the Tensix core’s internal buffers.
- The T1 core is typically used to instruct the Tensix core’s vector and matrix unit (FPU and SFPU) to perform math on the Tensix core’s internal buffers. It has a smaller instruction cache than T0 or T2.
-
The T2 core is typically used to instruct the Tensix core’s Packers to move data from the Tensix core’s internal buffers back out to L1.
It also implements a subset of the
Vextension.
-
The B core can write values to the T0–2 cores via special FIFOs. It seems easiest to use it to orchestrate the entire tile’s operations.
-
The NC core is mostly for communicating with the NoC. It has a private 16KiB buffer for instructions, but this cannot be written with normal store instructions; another core has to instruct the Tensix core’s Mover to copy code into it.

The T0–2 cores have a useful extension, the .ttinsn extension.
The RV32I ISA requires the two low bits of any instruction to be 0b11.
Most cores implement the C extension, which uses the rest of encoding space for 16-bit instructions.
The RISC-V cores don’t implement the C extension.
Instead, that encoding space is used for Tensix instructions (rotated left by two bits).
When a Tensix instruction is encountered, it gets pushed to the Tensix core.
Up to four instructions can get fused so they all get pushed in the same cycle, where they end up in a FIFO.

It’s helpful in the goal of getting 100% occupancy to also take advantage of the MOP expander and replay expander. The MOP expander allows defining macro-instructions that expand to loops. The replay expander allows capturing a simple sequence of instructions. A MOP can expand to a replay.
Next time
Now that we’ve seen the architecture that we’re writing code for, we can actually go about doing so! The next post will briefly cover the userspace API for talking to the Blackhole from Linux, and go over a first kernel to test it.
Tenstorrent Transformer Training: A first kernel (00_write_to_sram)
Published: 2025-12-27Last time, we went over the architecture of the Tenstorrent Blackhole. In this post, we’ll write our first kernel for it. The first thing to do is to see how to write code for the card to run in the first place.
We’ll stick with tt-kmd (Tenstorrent’s kernel module) to provide the low-level interface to the Blackhole. I’m using tt-kmd 2.6.0-rc1.
tt-kmd gives an ioctl-based interface to the Blackhole. The main interface it provides is the ability to allocate and map “TLBs.” It feels like these are better understood as “page table entries,” but I’ll use the “TLB” terminology to stay consistent with the docs.
A TLB is an area of memory that the Blackhole provides, which maps all reads and writes into IO operations to the NoC.
Userspace API
I’ll give an outline of the API I’m using for this, and call out any surprising details while omitting uninteresting code.
Each Blackhole card gets a RAII object, which just holds an OwnedFd for the card’s /dev/tenstorrent device node:
pub struct Blackhole { … }
impl Drop for Blackhole { … }

impl Blackhole {
    /// Tries to open the first discovered Blackhole card.
    pub fn open_any() -> Result<Blackhole> { … }
}
TLBs can be allocated for the card. They each own the mapped memory on the host.
TLBs can either be 2MiB or 4GiB, and mapped either as uncached or as write-combining.
In this API, these notions are tied together; 2MiB TLBs tend to be for Tensix cores, where there are no large memcpys and writes will often be to MMIO registers.
4GiB TLBs, on the other hand, will typically be used for DRAM, where the opposite is true.
pub struct Tlb<'blackhole> { … }
impl<'blackhole> Drop for Tlb<'blackhole> { … }

impl Blackhole {
    /// Allocates a 2MiB TLB, mapped with uncached memory.
    pub fn allocate_core_tlb(&self) -> Result<Tlb<'_>> { … }

    /// Allocates a 4GiB TLB, mapped as write-combining.
    pub fn allocate_dram_tlb(&self) -> Result<Tlb<'_>> { … }
}
Once a TLB is allocated, it can be configured. This sets which NoC is used to perform accesses, which tile’s memory is being accessed, which addresses are written to, and the memory ordering used for the writes.
The memory ordering is again controlled by the size of TLB — 2MiB TLBs use the default memory ordering, while 4GiB TLBs use posted writes, speeding up memcpys to them.
We’ll need extra fencing of memory writes from the host to DRAM later because of this, but the performance gains should be worth it.
impl<'blackhole> Tlb<'blackhole> {
    /// Configures the memory a TLB refers to.
    ///
    /// - `addr` gives the top 43 or 32 (depending on the size
    ///   of the TLB) bits of the address that this TLB will
    ///   access on the target tile(s).
    /// - `noc` and `targets` give the tile or tiles to be
    ///   written to.
    pub fn configure(
        &mut self,
        addr: u64,
        noc: u8,
        targets: Targets,
    ) -> Result<()> { … }
}

pub struct Coordinate(u8, u8);

impl Coordinate {
    pub fn new(x: u8, y: u8) -> Coordinate { … }
}

pub enum Targets {
    /// A single tile.
    One(Coordinate),

    /// A rectangular grid of Tensix tiles.
    Rect { upper_left: Coordinate, bottom_right: Coordinate },
}
Finally, there’s a method to get a handle to a mapped pointer corresponding to an absolute address on the configured tile(s). This handle lets us access the memory in the obvious way.
Note that if a TLB is configured to write to multiple tiles, it cannot be read from.
impl<'blackhole> Tlb<'blackhole> {
    /// Returns a structure that represents the index in the
    /// TLB for the given (absolute) address, and allows
    /// performing I/O to that address.
    pub fn at(&'_ self, addr: u64) -> TlbIndex<'_> { … }
}

pub struct TlbIndex<'tlb> { … }

impl<'tlb > TlbIndex<'tlb> {
    pub fn read_u8(&self) -> u8 { … }
    pub fn read_u16(&self) -> u16 { … }
    pub fn read_u32(&self) -> u32 { … }
    pub fn read_u64(&self) -> u64 { … }

    pub fn write_u8(&self, value: u8) { … }
    pub fn write_u16(&self, value: u16) { … }
    pub fn write_u32(&self, value: u32) { … }
    pub fn write_u64(&self, value: u64) { … }
}
Running the kernel
As a simple test, we’ll start with a simple example. This example will store a constant value to a fixed SRAM address. This program will use only one Tensix tile’s B core.
The assembly code for this kernel is trivial:
/*                       pseudo-code   machine code */

addi a0, zero, 0x123 /*  a0 := 0x123     0x12300513 */
sw a0, 0x100(zero)   /*  *0x100 := a0    0x10a02023 */
jal zero, 0          /*  loop forever    0x0000006f */
Now, we have to make this code run using code on the host. To do this, we have to:
- Connect to the Blackhole card.
- Choose a tile to write to. (We’ll just hard-code this for now.)
- Write the machine code to execute into the tile’s L1.
- Clear the memory the kernel writes to.
- Unhalt the core.
- Wait for the kernel to finish.
- Read the results.
The first two steps are easy: the Blackhole::open_any() function connects to the card, and we can use the T0 tile by hard-coding (1, 2) as the target.
let bh = Blackhole::open_any()?;

let t0 = Targets::One(Coordinate::new(1, 2));
To figure out where to write the machine code, we can look at the Tensix tile memory map. This memory map can be viewed here. (Note that the host can only write to the areas mapped in the column labelled “NoC.”)
Our code will live in the “L1 scratchpad RAM” area.
After the B core leaves reset, its pc will contain 0x00000000, so our code should start there.
We can create a TLB for writing to this area and write the machine code with the following code:
let mut core_l1 = bh.allocate_core_tlb()?;
core_l1.configure(0x0000_0000, 0, t0)?;

core_l1.at(0x0000_0000).write_u32(0x12300513);
core_l1.at(0x0000_0004).write_u32(0x10a02023);
core_l1.at(0x0000_0008).write_u32(0x0000006f);
We can clear the word the kernel writes to (at 0x100) using this TLB as well:
core_l1.at(0x0000_0100).write_u32(0x00000000);
Next, we need to unhalt the core.
We can do this with one of the debug registers listed in the memory map (0xffb12000 to 0xffb12fff).
The soft reset bits live in the word at 0xffb121b0, and are documented here.
In this case, we can see that bit 11 controls whether the B core is held in reset.
We can create a TLB for writing to the debug registers and write set this bit with the following code:
let mut core_debug_regs = bh.allocate_core_tlb()?;
core_debug_regs.configure(0xffa0_0000, 0, t0)?;

// Unhalt the B core (by leaving all the other resources on the
// tile halted).
core_debug_regs.at(0xffb1_21b0).write_u32(0x047000);
In a normal kernel, we’d signal completion by writing to some memory cell, and the host side would poll on it.
In this example, writing to some memory cell and observing it from the host is all we can do, so we just wait for the kernel to complete by waiting a second and knowing that the Blackhole is clocked a lot faster than 3Hz.
After that, we can put the B core back into the halt state.
sleep(Duration::from_millis(1));

core_debug_regs.at(0xffb1_21b0).write_u32(0x047800);
Finally, we can read back the value the kernel wrote using the TLB that refers to L1.
eprintln!("{:#x}", core_l1.at(0x0000_0100).read_u32());
This program is available as examples/00_write_to_sram.rs in the repo.
When run, it prints 0x123, as expected!
Next time
Writing code that runs on a single Tensix tile is an important first step, but to do anything real, we’ll need to be able to communicate between tiles. The DRAM tiles are the simplest tiles to communicate with, so in the next post, we’ll try communicating with them.
CTF Writeup: return of fzz buzz
Published: 2025-04-24I didn’t formally compete in ACM UMN’s 2025 Spring CTF last week (I provided a challenge and had access to the others, so I was ineligible), but I did try to complete one of the challenges, “return of fzz buzz.”
It was a lot of fun, and the writeup seemed like a good way to showcase some program reasoning stuff that we teach in our functional programming course in a setting that’s totally outside the classroom.
The challenge is as follows:
Oh no, keys are breakng on my keyboard!! Please help me wrte Fzz Buzz usng Python, but wth a twst!
Read 1 lne of nput as n, a, b.
For ntegers 1 .. n.
- dvsble by a => prnt
"Fizz"- dvsble by b => prnt
"Buzz"- dvsble by both => prnt
"FizzBuzz"- otherwse => prnt the number
You get 2000 chars of source, no eval/exec, most of stdlb dsabled
Example nput
12 2 3Example output
1
Fizz
Buzz
Fizz
5
FizzBuzz
7
Fizz
Buzz
Fizz
11
FizzBuzz
The “broken keys” turn out to be Ii and :; — our code can’t contain any of those four characters. The standard library modules that were removed also turned out to essentially just be those involved in performing IO, so we can’t do a reverse shell or something similar.
The straightforward solution would essentially be:
n, a, b = map(int, input().split())

for i in range(1, n + 1):
    if i % b != 0:
        if i % a != 0:
            print(i)
        else:
            print("Fizz")
    else:
        if i % a != 0:
            print("Buzz")
        else:
            print("FizzBuzz")
There are three main problems with using this code for this challenge.
- The expression
map(int, input().split())is full ofi’s, andprinthas one too. - We can’t use
ifto branch, since theifkeyword has aniin it. This applies to bothifstatements (which also have a:) andifexpressions (likex = (3 if y == z else 4)). - We can’t use
fororwhileto iterate, or even a list comprehension or generator expression — the former two require a:, while the latter two require theinkeyword.
We can do some mild refactoring to split these problems up from each other:
n, a, b = map(int, input().split())

def fizzbuzz_one(i) -> str:
    if i % b != 0:
        if i % a != 0:
            return str(i)
        else:
            return "Fizz"
    else:
        if i % a != 0:
            return "Buzz"
        else:
            return "FizzBuzz"

for i in range(1, n + 1):
    out = fizzbuzz_one(i)
    print(out)
Now, we can look at solving each problem separately. This is gonna be a bit long, since I hope this can introduce people unfamiliar with these kinds of tricks to them, plus jog some readers’ memories of their functional programming courses.
Builtin Functions and IO
The first thing to do will be to read the n, a, and b parameters, and find a way to print our eventual output.
Not being able to use i means we can’t just call print or input.
This is actually fairly easy to work around, with some knowledge about where builtin functions in Python come from.
First, we define j to be the string i.
We do this with the chr function, which accepts a Unicode code point and returns a string with that single code point in it.
j = chr(105)
We can use j in format strings to (relatively) readably write strings with i in them (e.g. f"str{j}ng" instead of "string").
With this, we can get access to builtin functions like print via the builtins module, which is available via globals()["__builtins__"].
bujltjns = globals()[f"__bu{j}lt{j}ns__"]
This module contains all the familiar (and some unfamiliar) pre-defined functions in Python.
We start by getting access to the input, int, list, and print functions.
getattr is the function equivalent of the dot operator, so getattr(x, "y") is the equivalent of x.y and getattr(bujltjns, "list") is the equivalent of bujltjns.list.
jnput = getattr(bujltjns, f"{j}nput")
jnt = getattr(bujltjns, f"{j}nt")
ljst = getattr(bujltjns, f"l{j}st")
prjnt = getattr(bujltjns, f"pr{j}nt")
Next, we’ll need the functools.partial function.
This lets us construct a new callable object with some parameters already provided to a function, like what currying lets us do in many functional languages.
This lets us avoid writing some lambdas (which we can’t use because they contain :), which will end up being pretty useful.
This also makes functools the first module we need to import.
We can’t use the import keyword as-is, because it contains an i.
Instead, we can rely on another builtin function — __import__.
Since this is just a normal function, we can get it the same way we got print and use it to do the import.
jmport = getattr(bujltjns, f"__{j}mport__")
partjal = getattr(jmport("functools"), f"part{j}al")
With all the parts we have, we can read the inputs to our program.
Note that we can use getattr for method calls as well.
n, a, b = map(jnt, getattr(jnput(), f"spl{j}t")())
Now that we have our inputs and a way to print, we can get on to the restrictions caused by missing keywords.
Conditionals
We can’t use if statements or expressions, so we need to find a different way to express conditional control flow.
Two different ways come to mind for how to do this in “normal” programming (these tricks can be useful when writing SIMD code or GPU shaders):
-
Figure out some formula that computes the right answer at the points we care about (possibly producing nonsense at the points we don’t care about).
-
Turn the code into a pure function, compute all possibilities, then select the right one (e.g. by reading it out of a table).
There might be some fancy way to use the former for Fizzbuzz, but I mostly think of it as being applicable when the result is a number rather than a string, so I pursued the latter option.
That option would mean turning code like this:
def fizzbuzz_one(i) -> str:
    if i % b != 0:
        if i % a != 0:
            return str(i)
        else:
            return "Fizz"
    else:
        if i % a != 0:
            return "Buzz"
        else:
            return "FizzBuzz"
into code like this:
def fizzbuzz_one(i) -> str:
    # We still need a formula for this part!
    if i % b != 0:
        if i % a != 0:
            index = 0
        else:
            index = 1
    else:
        if i % a != 0:
            index = 2
        else:
            index = 3

    answers = [str(i), "Fizz", "Buzz", "FizzBuzz"]
    return answers[index]
As noted in the code block, we still need a way to compute index without branching.
The benefit of the table-based approach is that since we control the layout of the table, we can choose the indices we want to compute, so the formula for them is usually a lot simpler.
In this case, we can see the index as being a two-bit number, with each bit being one of the i % a != 0 flags.
This lets us compute it as:
def fizzbuzz_one(i) -> str:
    a_flag = (1 if i % a == 0 else 0)
    b_flag = (1 if i % b == 0 else 0)
    index = b_flag * 2 + a_flag
    answers = [str(i), "Fizz", "Buzz", "FizzBuzz"]
    return answers[index]
This is now using if expressions, but we can get rid of them by relying on a possibly-questionable design choice in Python: the bool class extends the int class, such that, for example, (True + True) = 2.
This simplifies the code down to:
def fizzbuzz_one(i) -> str:
    a_flag = i % a == 0
    b_flag = i % b == 0
    index = b_flag * 2 + a_flag
    answers = [str(i), "Fizz", "Buzz", "FizzBuzz"]
    return answers[index]
At this point we’ve gotten rid of if, so our next challenge is getting rid of the function definition.
We’ll see exactly why next section, but it’s useful that we still have a single fizzbuzz_one function — we just can’t use def or lambda to define it, because that requires a :.
Iteration
In solving the problem, we can’t use for or while, since they would require a :.
We can’t use list comprehensions or generator expressions either, since they would require the in keyword.
One remaining way to iterate that we do still have available is the map function.
As long as we’re operating on iterables, we can run functions on them.
It’s also worth noting that map can operate on multiple iterables at a time.
We’ll use this to transform our code next. At the end of our chain of iterables, we have to demand all the items, which we do by collecting them into a list.
def fizzbuzz_one(i) -> str:
    a_flag = i % a == 0
    b_flag = i % b == 0
    index = b_flag * 2 + a_flag
    answers = [str(i), "Fizz", "Buzz", "FizzBuzz"]
    return answers[index]

outs = map(fizzbuzz_one, range(1, n + 1))
list(map(print, outs))
This is why we want to keep fizzbuzz_one as a function.
We can still define this function as method that we assign, like f = x.g.
We’ll rely on this to define our function.
However, we need to find a way to keep i passed around.
We can split fizzbuzz_one apart to make the separate dependencies more evident:
def get_a_flag(i):
    return i % a == 0

a_flags = map(get_a_flag, range(1, n + 1))

def get_b_flag(i):
    return i % b == 0

b_flags = map(get_b_flag, range(1, n + 1))

def get_index(a_flag, b_flag):
    return a_flag + b_flag * 2

indices = map(get_index, a_flags, b_flags)

def get_answers(i):
    return [str(i), "Fizz", "Buzz", "FizzBuzz"]

answers_lists = map(get_answers, range(1, n + 1))

def index_into_answers(answers, index):
    return answers[index]

outs = map(index_into_answers, answers_lists, indices)
list(map(print, outs))
We can then start transforming away each of these smaller functions.
The easiest one to start with is index_into_answers.
It’s actually already equivalent to list.__getitem__, the method used to implement the a[i] syntax:
def get_a_flag(i):
    return i % a == 0

a_flags = map(get_a_flag, range(1, n + 1))

def get_b_flag(i):
    return i % b == 0

b_flags = map(get_b_flag, range(1, n + 1))

def get_index(a_flag, b_flag):
    return a_flag + b_flag * 2

indices = map(get_index, a_flags, b_flags)

def get_answers(i):
    return [str(i), "Fizz", "Buzz", "FizzBuzz"]

answers_lists = map(get_answers, range(1, n + 1))
outs = map(list.__getitem__, answers_lists, indices)
list(map(print, outs))
We next work on transforming away get_a_flag and get_b_flag.
One standard way to get rid of function definitions you might recall from a functional programming course is eta contraction.
This is the transformation from lambda x: f(x) into f.
We can rewrite get_a_flag as a lambda to see more obviously how to apply this.
get_a_flag = lambda i: i % a == 0
a_flags = map(get_a_flag, range(1, n + 1))
To make it more clear, i % a == 0 can be transformed into method calls:
get_a_flag = lambda i: i.__mod__(a).__eq__(0)
a_flags = map(get_a_flag, range(1, n + 1))
This isn’t the form we want though: we have two function calls, not one, and the argument to the lambda is in the exact wrong spot! We can split the function into two to fix the first problem.
This relies on the identity:
map(lambda x: f(g(x)), xs) = map(f, map(g, xs))
This might be another one you remember from a functional programming class.
mod_by_a = lambda i: i.__mod__(a)
get_a_flag = lambda x: x.__eq__(0)
a_flags = map(get_a_flag, map(mod_by_a, range(1, n + 1)))
Now we just need to get rid of the lambdas in the two functions.
This is easy for get_a_flag: since int.__eq__ is commutative, we could instead write it as:
mod_by_a = lambda i: i.__mod__(a)
get_a_flag = lambda x: (0).__eq__(x)
a_flags = map(get_a_flag, map(mod_by_a, range(1, n + 1)))
We can then apply eta contraction:
mod_by_a = lambda i: i.__mod__(a)
get_a_flag = (0).__eq__
a_flags = map(get_a_flag, map(mod_by_a, range(1, n + 1)))
Then, since the definition is simple, we can inline it:
mod_by_a = lambda i: i.__mod__(a)
a_flags = map((0).__eq__, map(mod_by_a, range(1, n + 1)))
Flipping int.__mod__ is a bit tricker, since it’s not commutative.
However, as part of operator overloading, Python defines “reflected” versions of all the overloadable operators.
Basically, when you run 1 + x, Python doesn’t just call (1).__add__(x); instead, it’s more like it does:
out = (1).__add__(x)
# NotImplemented is a special constant
if out == NotImplemented:
    out = x.__radd__(1)
This gives x the ability to define how it behaves when it’s added to 1, even when it’s on the right-hand side of the addition.
Conveniently for us, there’s a reflected version of mod, int.__rmod__.
Because the arguments are reversed, (3).__mod__(2) = (2).__rmod__(3).
If we rewrite mod_by_a to use __rmod__ instead, we get:
mod_by_a = lambda i: a.__rmod__(i)
a_flags = map((0).__eq__, map(mod_by_a, range(1, n + 1)))
This can then be eta-contracted and inlined as well:
a_flags = map((0).__eq__, map(a.__rmod__, range(1, n + 1)))
We can apply the same reasoning for get_b_flag:
b_flags = map((0).__eq__, map(b.__rmod__, range(1, n + 1)))
The remaining part of the program is then:
def get_index(a_flag, b_flag):
    return a_flag + b_flag * 2

indices = map(get_index, a_flags, b_flags)

def get_answers(i):
    return [str(i), "Fizz", "Buzz", "FizzBuzz"]

answers_lists = map(get_answers, range(1, n + 1))
outs = map(list.__getitem__, answers_lists, indices)
list(map(print, outs))
We can use a similar process to transform away get_index.
First, we split it into two functions and transform them into method calls in lambdas as before:
double = lambda b_flag: b_flag.__mul__(2)
get_index = lambda a_flag, b_flag: a_flag.__add__(b_flag)
indices = map(get_index, a_flags, map(double, b_flags))
We can flip, eta-contract, and inline double:
get_index = lambda a_flag, b_flag: a_flag.__add__(b_flag)
indices = map(get_index, a_flags, map((2).__mul__, b_flags))
get_index can then be transformed to use int.__add__ as a function, rather than calling it as a method:
get_index = lambda a_flag, b_flag: int.__add__(a_flag, b_flag)
indices = map(get_index, a_flags, map((2).__mul__, b_flags))
It, too, can be eta-contracted and inlined.
jndjces = map(jnt.__add__, a_flags, map((2).__mul__, b_flags))
This leaves us with just:
def get_answers(i):
    return [str(i), "Fizz", "Buzz", "FizzBuzz"]

answers_lists = map(get_answers, range(1, n + 1))
outs = map(list.__getitem__, answers_lists, indices)
list(map(print, outs))
Putting it all together
I wasn’t actually able to figure out how to write get_answers as the composition of simpler functions.
Instead, I took a different approach: separating where i gets passed in from where the list gets constructed.
If instead of a function that returns a list, we have a list of functions, it might look like:
answer_funcs = [
    lambda i: str(i),
    lambda i: "Fizz",
    lambda i: "Buzz",
    lambda i: "FizzBuzz",
]

def get_answer(index, i):
    return answer_funcs[index](i)

outs = map(get_answer, indices, range(1, n + 1))
list(map(print, outs))
This once again gives us some lambdas to translate away.
Applying eta-contraction to answer_funcs[0] and splitting up get_answer as before gets us to:
answer_funcs = [
    str,
    lambda i: "Fizz",
    lambda i: "Buzz",
    lambda i: "FizzBuzz",
]

def get_func(index):
    return answer_funcs[index]
def get_answer(answer_func, i):
    return answer_func(i)

funcs = map(get_func, indices)
outs = map(get_answer, funcs, range(1, n + 1))
list(map(print, outs))
get_func can be written as a call to the __getitem__ method:
answer_funcs = [
    str,
    lambda i: "Fizz",
    lambda i: "Buzz",
    lambda i: "FizzBuzz",
]

def get_answer(answer_func, i):
    return answer_func(i)

funcs = map(answer_funcs.__getitem__, indices)
outs = map(get_answer, funcs, range(1, n + 1))
list(map(print, outs))
The biggest remaining issue is how to write a function that ignores its argument.
This is where functools.partial comes in, along with max.
max on strings uses lexicographic comparison on Unicode scalar values, so any string that starts with an ASCII digit (e.g. 2) will be less than any string that starts with an ASCII letter (e.g. L).
Because of this, max("Fizz", x) is equal to x whenever x starts with an ASCII digit.
If x is str(i), this will always be the case, so partial(max, "Fizz") will always return "Fizz" on these inputs.
Simply applying this transformation gets us to:
answer_funcs = [
    str,
    lambda i: partial(max, "Fizz")(str(i)),
    lambda i: partial(max, "Buzz")(str(i)),
    lambda i: partial(max, "FizzBuzz")(str(i)),
]

def get_answer(answer_func, i):
    return answer_func(i)

funcs = map(answer_funcs.__getitem__, indices)
outs = map(get_answer, funcs, range(1, n + 1))
list(map(print, outs))
We could almost eta-contract away the i, except for the str call this introduces.
It’s necessary to keep that call, though, because max("Fizz", 2) is a type error.
If we move the str call out to the caller (get_answer), though, we can eta contract.
This doesn’t break answer_funcs[0], because the str function is the identity when applied to a string.
answer_funcs = [
    str,
    partial(max, "Fizz"),
    partial(max, "Buzz"),
    partial(max, "FizzBuzz"),
]

def get_answer(answer_func, i):
    return answer_func(str(i))

funcs = map(answer_funcs.__getitem__, indices)
outs = map(get_answer, funcs, range(1, n + 1))
list(map(print, outs))
Our final challenge is getting rid of get_answer.
We can again split it, letting the str call end up in the iterators:
answer_funcs = [
    str,
    partial(max, "Fizz"),
    partial(max, "Buzz"),
    partial(max, "FizzBuzz"),
]

def call_answer_func(answer_func, i):
    return answer_func(i)

funcs = map(answer_funcs.__getitem__, indices)
outs = map(call_answer_func, funcs, map(str, range(1, n + 1)))
list(map(print, outs))
At this point, it’d be really nice if we could do something like our previous trick of replacing index_into_answers with list.__getitem__.
Calls are in fact overloadable, with the __call__ method.
However, we don’t know what class to call it on!
The answer_funcs[0] function is of the actual function class, while the rest are of the partial class.
One last bit of cleverness gets around this: if we just pass a function to the partial constructor with no arguments, it gets wrapped in the partial class, but no additional arguments are passed.
We can apply this to change the code to:
answer_funcs = [
    partjal(str),
    partjal(max, f"F{j}zz"),
    partjal(max, "Buzz"),
    partjal(max, f"F{j}zzBuzz"),
]

funcs = map(getattr(answer_funcs, f"__get{j}tem__"), jndjces)
outs = map(partjal.__call__, funcs, map(str, range(1, n + 1)))
ljst(map(prjnt, outs))
This completes the challenge! The complete code is as follows:
j = chr(105)

bujltjns = globals()[f"__bu{j}lt{j}ns__"]
jnput = getattr(bujltjns, f"{j}nput")
jnt = getattr(bujltjns, f"{j}nt")
ljst = getattr(bujltjns, f"l{j}st")
prjnt = getattr(bujltjns, f"pr{j}nt")
jmport = getattr(bujltjns, f"__{j}mport__")
partjal = getattr(jmport("functools"), f"part{j}al")

n, a, b = map(jnt, getattr(jnput(), f"spl{j}t")())

a_flags = map((0).__eq__, map(a.__rmod__, range(1, n + 1)))
b_flags = map((0).__eq__, map(b.__rmod__, range(1, n + 1)))
jndjces = map(jnt.__add__, a_flags, map((2).__mul__, b_flags))

answer_funcs = [
    partjal(str),
    partjal(max, f"F{j}zz"),
    partjal(max, "Buzz"),
    partjal(max, f"F{j}zzBuzz"),
]

funcs = map(getattr(answer_funcs, f"__get{j}tem__"), jndjces)
outs = map(partjal.__call__, funcs, map(str, range(1, n + 1)))
ljst(map(prjnt, outs))
This code works, and doesn’t use Ii nor :;.
Doing this challenge was a lot of fun, and I’m glad I was able to find the time to do it!
Latest reboot of the blog
Published: 2024-11-17Another year-long gap, five years after the last one. Yet again, the cause is “problems with the static site generator made it so I didn’t want to write when I had writing time.”
As before, I only migrated the articles that I’ve had cause to refer people to. The blog is still in the same Git repo (https://git.sr.ht/~remexre/blog), with snapshots of old versions at Git tags:
This time around, I’m authoring in the HTML you see rendered here, without a static site generator in between. Can’t break it if it’s not there, after all.
At the moment, this also means that there’s no way to comment. It’s not like I was getting tons of them before, so I may or may not bring them back.
If you want to comment on a post here, send an email to ~remexre/public-inbox@lists.sr.ht — I’ll make an effort to link them here, and maybe build something to do this if I’m getting more than two or three per year. This list is also archived publically.
Using Nix Flakes and direnv to manage a dev shell for projects that don’t use Nix
Published: 2024-11-16Typically, projects that I need to do this for are associated with some organization; e.g. melt for the lab I’m in. This approach relies on having a directory that contains the non-Nix project, and organizations tend to be convenient, so I make this file structure:
~/src/
├── melt/
│   ├── .envrc
│   ├── shell/
│   │   ├── flake.lock
│   │   └── flake.nix
│   ├── shell.nix
│   └── example-project/
│       └── …
└── …
The shell directory contains a flake with a devShells.default that contains all the dependencies I need.
Notably, it does not reference example-project in any way.
It can be a Git repo if this is to your liking, but this isn’t necessary.
Run nix shell in this directory at least once, to create or update flake.lock — one of the disadvantages of this approach is that flake.lock is not automatically updated.
The shell.nix is used to let us import the flake and get its dev shell in the non-flake Nix world.
The version of it I currently use is:
let
  inherit (builtins) currentSystem getFlake;
  flake = getFlake (toString ./shell);
in
flake.outputs.devShells.${currentSystem}.default
Finally, the .envrc just says to load the dev shell from the shell.nix:
use nix
Note that direnv won’t be monitoring flake.nix for changes, so you may need to run direnv reload after updating it.
Discussion
-
This approach avoids some of the problems with other solutions:
-
Unlike placing a
flake.nixinsideexample-project/, there’s no need to avoid committing theflake.nix,.envrc,.direnv/, etc.This could be done without needing to modify the project’s
.gitignorenor exercising manual care by editing.git/info/exclude. -
Unlike placing a
flake.nixin themelt/directory, this approach does not copy theexample-project/directory (including any.gitignored files within it!) into the Nix store.
-
-
This approach tacitly assumes you’ll have several related projects with the same dependencies. I have generally found this to be the case in my own work, but of course not every workflow follows this pattern.
Pinebook Pro OSDev: Hello World
Published: 2020-02-08I recently got a Pinebook Pro, and I want to port StahlOS to it. The journey of a thousand miles begins with a single step, so here’s a journal entry on getting a “Hello, world” program running on it.
The Hardware
This is written about (and largely on) the ANSI model of the Pinebook Pro. Additionally, I use a cable to access the serial port, which wires it up to a 3.5mm headphone jack physical connector. Pine sells a nicely packaged cable, but as people on the forums note (and I’ve verified), it runs at 5 volts, which causes spooky behavior (up to and including hardware damage) on the Pinebook. Instead, I’m using some jumpers spliced to a headphone cord I cut in half to provide the physical connector to the board.
Initially, I tried Adafruit’s USB to TTL Serial Cable, since I already had it sitting around. However, it turns out it’s based on the CP2102 chip, which only supports speeds up to 1Mbps (1000000 baud). The RK3399 (the board inside the Pinebook Pro), however, boots at 1.5Mbps (1500000 baud). Instead, I bought a converter based on the PL2302DX, which can do up to 12Mbps.
Out of the Box
The Pinebook Pro ships with an ancient (oldstable?) version of Debian.
I ditched it for Manjaro running off an SD card.
From the default install, I systemctl disabled lightdm and installed i3 instead.
I’m doing most of my usage (including typing this!) from the kernel console in tmux, though.
A hardware switch needs to be flipped inside the device to enable UART2, which provides a serial port over the headphone jack. The Pine wiki documents the location of the switch fairly well; check it for pictures.
U-Boot
Once the serial port is connected, rebooting the machine shows the boot logs. Mashing Ctrl-C (or any key on the Manjaro U-Boot, it appears) gets a shell, with vaguely sh-like semantics.
I recommend updating to Manjaro’s U-Boot; the U-Boot the Pinebook Pro ships with (as of the January 2020 batch) can’t boot from 64-bit ELF files. If your machine boots with an amber power LED instead of a green one, that’s a strong indicator you’re on the newer Manjaro U-Boot.
The commands in the shell I find most useful are:
bootelf: Loads the ELF file at the given address, and jumps to its entrypoint.go: Jumps to the given address. Useful when loading raw binaries (not ELFs).load: Loads a file from a filesystem to an arbitrary address.loady: Loads a file over the ymodem protocol to an arbitrary address.md: Gives a hexdump of an arbitrary address. Note that it displays in little endian. Also callable asmd.b,md.w,md.l,md.qto display with different widths for atoms of data.
Toolchain
You’ll need at least binutils for the aarch64-none-elf target.
On Gentoo, this is fairly easy with crossdev.
It’ll also probably be useful to have your system binutils be built multitarget; this doesn’t apply to gas, though, so the aarch64-none-elf versions are still necessary.
Writing to the UART
The RK3399’s Technical Reference Manual is your friend for all of this; it notes that UART2 is mapped to 0xff1a0000.
There’s also some information on how to interface with the chip; if you’re familiar with programming the 8250 or 16550 UARTs, I believe it’s effectively the latter.
(Note that unlike how x86 serial ports are typically connected, the UARTs in the Pinebook Pro are all memory-mapped.)
We can write to the UART with an assembly sequence like:
ldr x0, =0xff1a0000 /* Load the x0 register with 0xff1a0000 */
mov x1, '!'         /* Load the x1 register with '!' (zero-extended) */
strb w1, [x0]       /* Store the value in x1 to the address given by x0 */
This stores the ! character in the Transmit Holding Register of the UART.
Technically, we need to wait for the Transmit Holding Register Empty Bit of the Line Status Register to be 1.
We do this with:
	ldr x0, =0xff1a0000
wait_for_tx_ok:
	ldrb w1, [x0, #0x14]      /* Offset the address in x0 by 0x14 */
	tbz w1, 5, wait_for_tx_ok /* Loop if bit 5 of x1 is zero */
Of course, a real OS should use the FIFOs, be interrupt-triggered, and maybe even use DMA. That’s outside the scope of this article, but I’ll probably touch on it in a future post.
Putting it All Together
We can use the above with a bit of glue code to make our “Hello, world” program:
.section .text

.global _start
_start:
	ldr x0, =0xff1a0000
	ldr x3, =msg
	mov x4, len
	bl write_string     /* Call the write_string procedure */
	b .                 /* Infinite loop */

/** write_string: Writes a string to a UART
 *
 * Input:
 *   x0: UART base address
 *   x3: Address of first character of string
 *   x4: Length of string
 *
 * Side Effects:
 * - Trashes x1, x2, x5
 */
write_string:
	cbz x4, write_string.end /* If x4 is zero, go to write_string.end */

write_string.wait_for_tx_ok:
	ldrb w1, [x0, #0x14]
	tbz w1, 5, write_string.wait_for_tx_ok

	ldrb w2, [x3], #1 /* After fetching a byte to w2, increment x3 */
	sub x4, x4, 1     /* Decrement x4 */
	strb w2, [x0]

	b write_string
write_string.end:
	ret

.section .rodata

msg: .string "Hello, world!\r\n"
.equ len, . - msg
We also need a linker script for this:
OUTPUT_FORMAT(elf64-littleaarch64)
ENTRY(_start)

MEMORY {
	kernel : ORIGIN = 0x00280000, LENGTH = 0x00080000
}

SECTIONS {
	.text : {
		. += SIZEOF_HEADERS;
		*(.text)
	} > kernel
	.rodata : { *(.rodata) } > kernel
}
We compile and link with:
aarch64-none-elf-as -o main.o main.s
aarch64-none-elf-ld -o main.elf -T linker.ld main.o -N -z max-page-size=4096
Aside: Tricks for a Smaller Executable
Thanks to clever and doug16k in the #osdev channel on Freenode (now on libera.chat) for showing me a couple of tricks to reduce the size of the ELF file:
- Adding
. += SIZEOF_HEADERS;to the first section, and passing-Ntoldlets LD overlap the.textsection with the ELF header itself. - Passing
-z max-page-size=4096toldlets it only align the sections to 4k instead of 64k.
This brings the binary size down from 66k to 1.3k.
Hello, world!
Finally, we’re ready to run our program.
Connect the Pinebook Pro to your serial port, connect Minicom to the serial port, and boot it.
Hit a key to drop to the U-Boot shell, then run loady 0x00880000 to start the upload.
Hit Ctrl-A, S to open Minicom’s “Send files” menu.
Once the file is uploaded, run bootelf 0x00880000.
If all’s gone well, you should see Hello, world! printed, followed by the machine hanging.
The StahlDream
Published: 2020-02-06The StahlDream is the shorthand I use for constructing a personal computing system, from the hardware up. This encompasses several programming languages, an operating system, at least two databases. (And that’s before I get to any actual applications.)
I realized I don’t actually have all this written down in one place anywhere, so this serves as a snapshot into the current vision.
This is certainly inspired by Oberon, which showed one could create a single-machine system in a few thousand lines of code (12,227 by one count). I don’t think I can fit a system in so few lines of code, but I also want to have a much more complicated language in use for most of the system.
StahlOS
The part I’m currently working on is an operating system on which the rest of the system runs. The system is quite minimal — there’s neither MMU-based process isolation, nor preemptive multitasking (though the latter point may change).
The StahlOS model fundamentally relies on all actual machine code executed by the CPU to be trustworthy, and disallows loading binaries other than the kernel itself. Instead, system drivers and essential processes are written in StahlOS Forth, which user programs are compiled to at runtime. Even the Forth programs themselves are only loadable from a read-only filesystem (excepting those that are compiled into the kernel), since Forth is low-level enough that it might as well be machine code, security-wise.
Each of the compiler processes only produce memory-safe code; assuming this property and the correctness of the above TCB, all code the system can run is memory-safe. This allows wholly ignoring the MMU as a security mechanism. Instead, memory ownership is implicit, and controlled at the page level. Each process (with exceptions such as a low-level debugging REPL) is shared-nothing, with message-passing as a fundamental operation, implemented as the transfer of page ownership. (I haven’t ruled out eventually allowing shared pages with STM or similar for concurrent modification, but I’m leery of shared pointers.)
StahlOS will also provide Erlang-like mechanisms for orchestrating processes (i.e. monitors and links). However, cross-machine message-passing will not be directly supported (and for this reason, message-passing should only really be considered a intra-app mechanism, despite being inter-process). Instead, applications should generally use the tuple space as a synchronization point: it’s not significantly more expensive than message passing for local communications, but allows remote communications.
Languages
Stahl
The primary language being designed currently, and the most complicated one by far, is Stahl. Stahl is a dependently typed lambda calculus with a Lisp-like syntax.
I’m probably basing the core type theory on the type theory presented in Homotopy Type Theory, but without the univalence axiom (at least, until I can figure out how to make it computable).
I also want to make the language the testbed for experimenting with automated theorem proving and making manual theorem proving convenient in a “casual” setting (e.g. from a smartphone while on a bus).
StahlOS Forth
StahlOS uses a Forth dialect as the low-level programming language. Forth is the best language I’ve found for bare-metal development. A Forth system can be constructed with amazingly little machine code; the resulting language is capable of Common Lisp-tier metaprogramming, while also being able to peek and poke at memory, without needing dynamic memory allocation.
Databases
Tuple Space
Tuple spaces are a sufficiently old, and sufficiently nice-seeming database abstraction that I’m honestly surprised there isn’t a high-quality implementation some programming subculture is smugly using (in same way similar subcultures exist for e.g. Smalltalk, Erlang, Common Lisp).
Essentially, a tuple space is a distributed multiset with five primitive operations:
put TUPLEadds a tuple to the multisettry-take PATTERNreturns a tuple matchingPATTERNif one exists in the multiset, removing it from the multisettry-peek PATTERNreturns a tuple matchingPATTERNif one exists in the multiset, without removing it from the multisettake PATTERN, TIMEOUTreturns a tuple matchingPATTERNif one can be found withinTIMEOUT, removing it from the multisetpeek PATTERN, TIMEOUTreturns a tuple matchingPATTERNif one can be found withinTIMEOUT, without removing it from the multiset
With a sufficiently expressive pattern language, it becomes easy to have applications sharing a database with loose coupling between them.
I need more design work to determine many of the details of this tuple space (as well as a name for it!) — particularly, I’m unsure of how precisely I want to make the database distributed. Given that I’m using it as a coordination mechanism as well as a (short-term) database, it’s not clear what semantics I actually want on netsplit. Furthermore, it seems like there ought to be a large class of optimizations I could apply to make common patterns of use more efficient, though these might require real-world usage data to evaluate.
G1
I’m already writing about G1 elsewhere, but I’ll summarize how it fits into the larger StahlDream.
The tuple space doesn’t seem particularly good as a database for bulk storage — I’m planning to implement it with the expectation that it will contain at most a few megabytes of data at once. I therefore want a flexible database for storing and querying larger data.
I’m planning to implement the tuple space on top of both StahlOS and some Linux system, likely with the Linux implementation being in Rust. The thinking here is somewhat similar to Erlang’s port drivers, which allow interfacing with a native-code process as if it were an Erlang process. G1 can then be easily bridged to StahlOS, by acting on the tuple space directly.
Helpful Tools for CSCI2021
Published: 2017-10-10This article aims to summarize some tools for CSCI2021, the computer architecture class, that weren’t being taught at the time of writing.
Some of these tools have started to be taught since — in that sense, this article is happily out-of-date.
radare2
radare2 can replace GDB, and has many more analysis tools.
Installing
Check your repos. It’s in the repos for Arch, Ubuntu, and Homebrew (for you macOS kids).
Example of Usage
Start radare2 with radare2 -d <program>.
Radare2 has very terse commands, unlike GDB. Reading a tutorial is highly recommended; try this one.
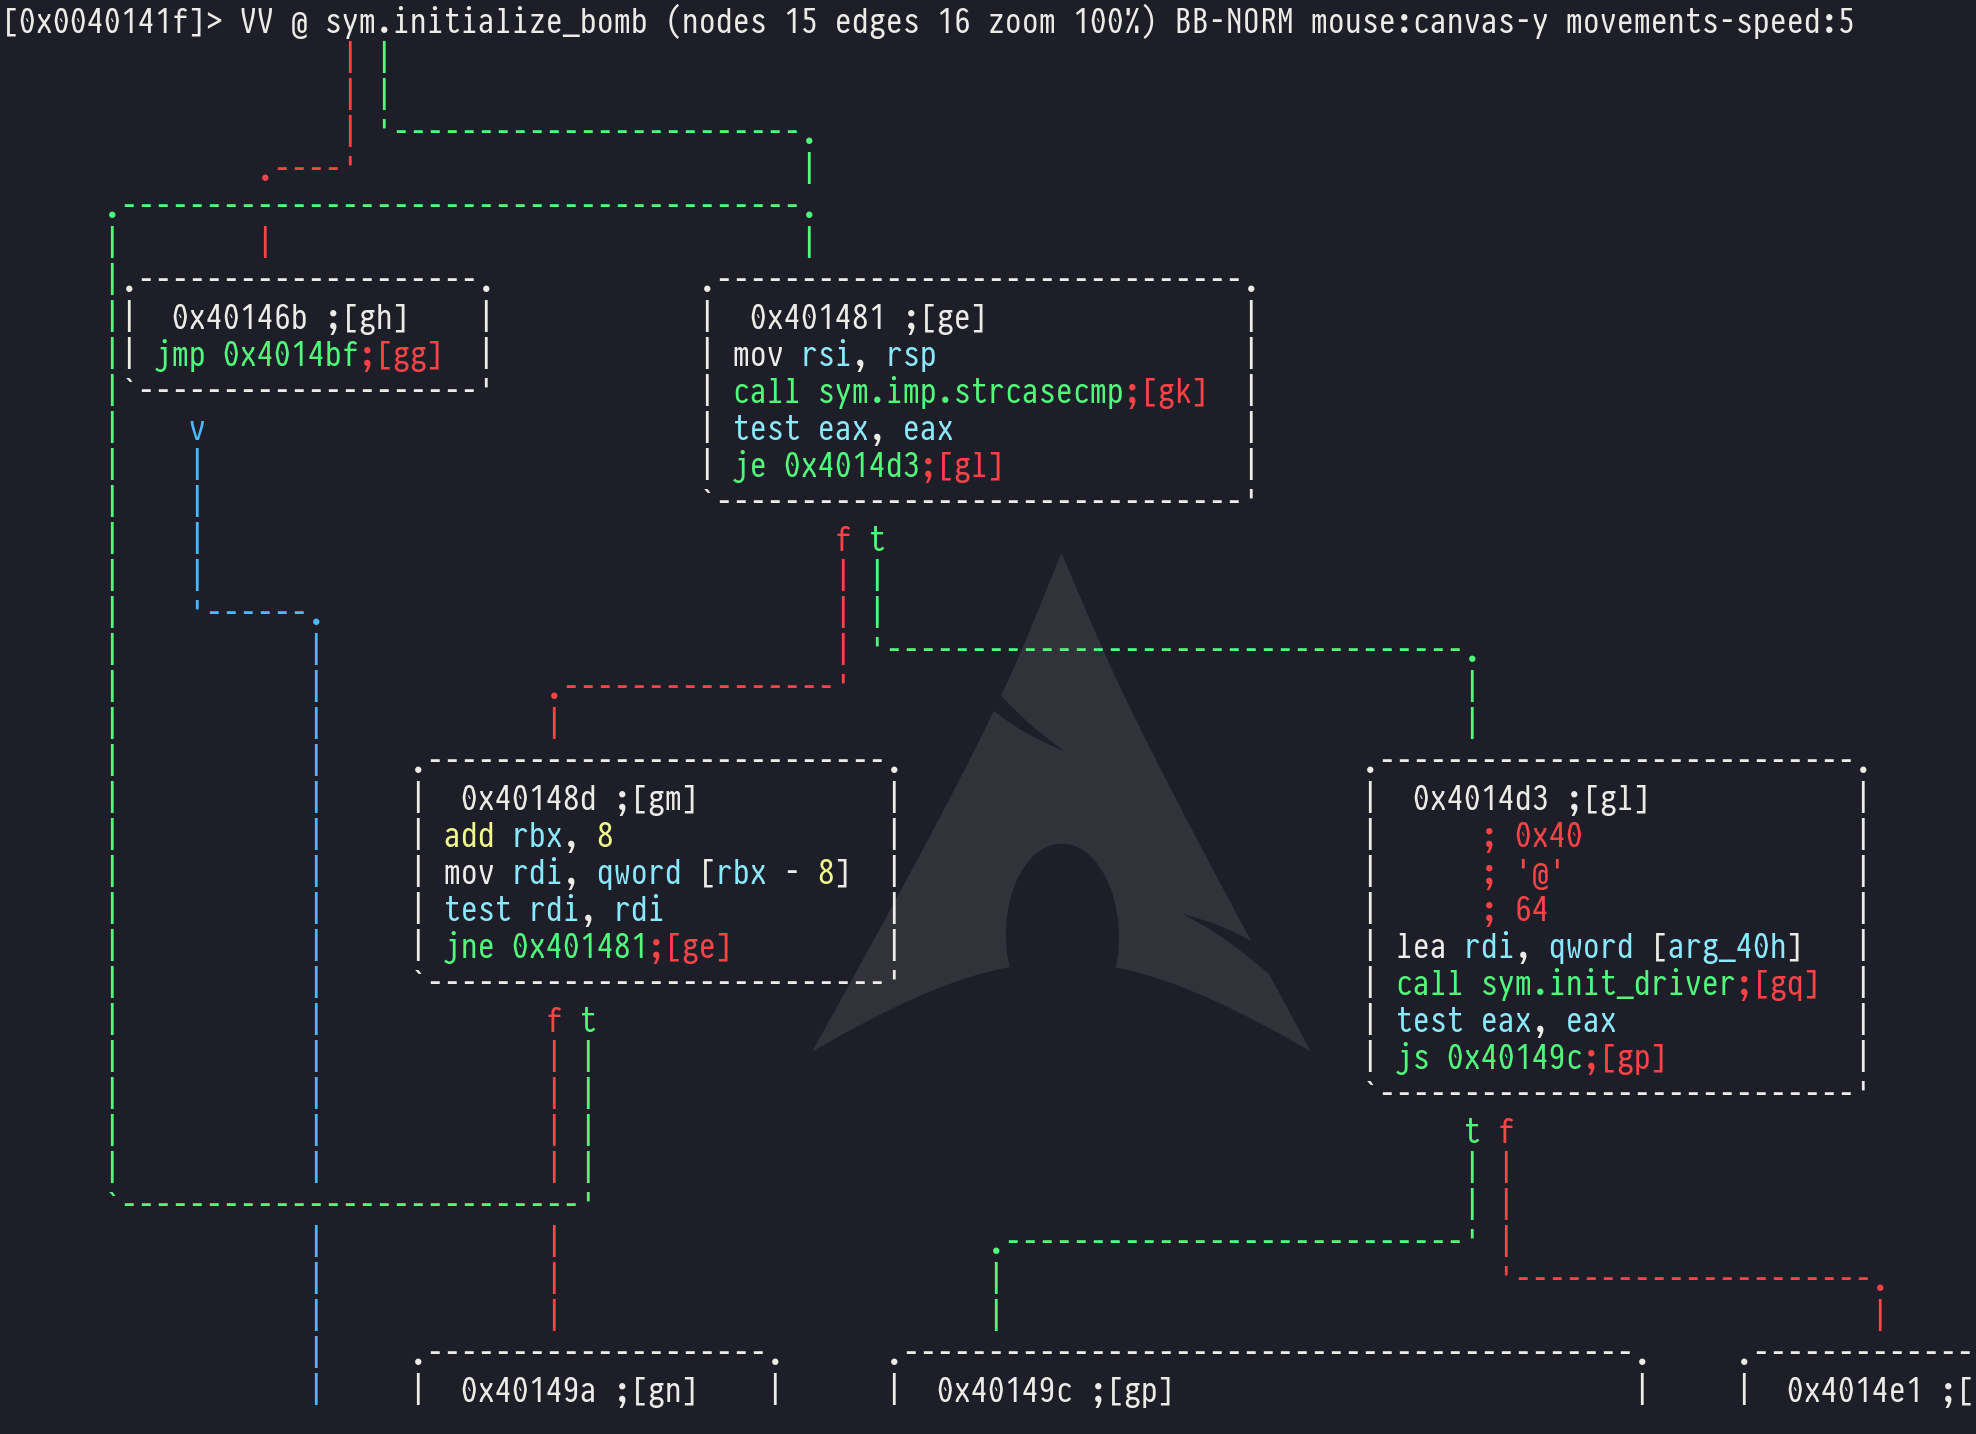
However, here’s a cool demo of one of the more useful things. Load your bomblab file with the above commands. Then run the commands:
aaa
VV @ sym.initialize_bomb
You can now use the arrow keys or Vim-style hjkl scrolling to pan around the control-flow graph of your bomb.
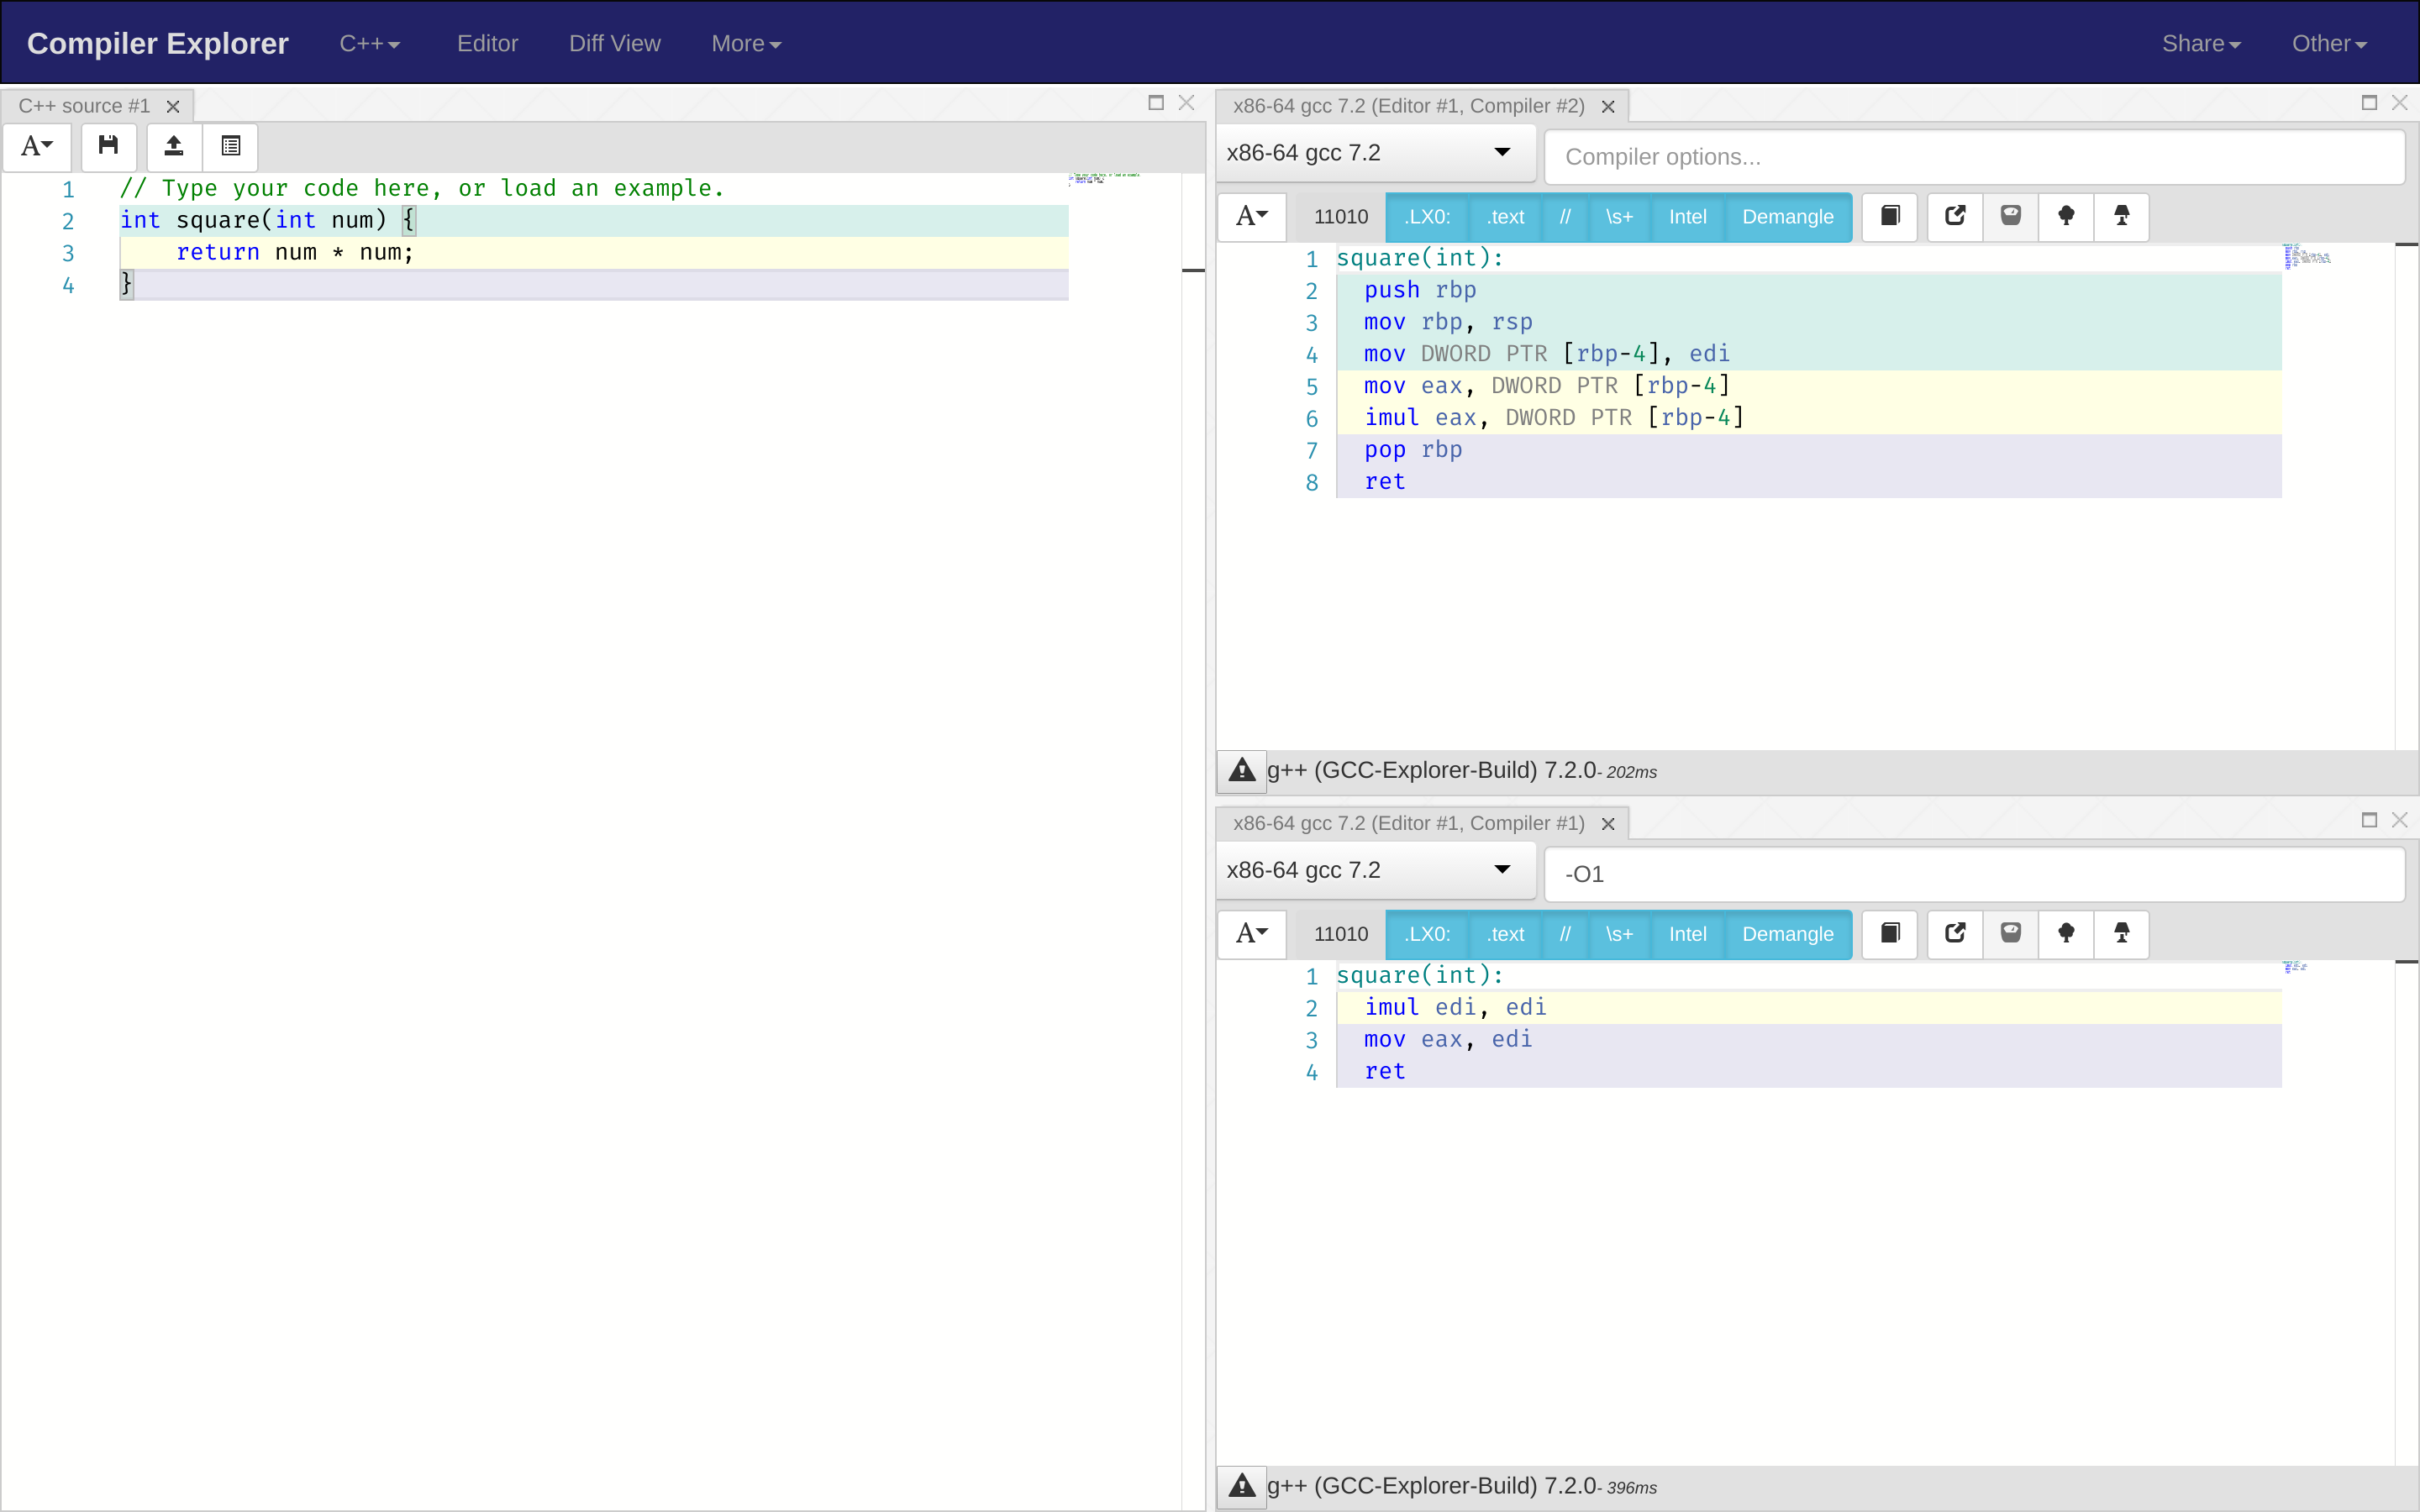
Godbolt
Godbolt Compiler Explorer is a useful online tool for reading the assembly output of C code. It highlights the lines different blocks of assembly come from too, which makes reading it much easier.
Protip: Use -O1 in the “Compiler Flags” field — it makes the code a lot more efficient without sacrificing much readability (and sometimes improving it).
Clang
Clang gives much better error messages than GCC.
Just replace gcc in your commands with clang.
It’s the default C compiler on macOS, and is installed on the CSELabs machines (and again is probably in your standard repos).
For example, instead of:
gcc -o main main.c
run
clang -o main main.c
Useful flags
Other flags that can check your code include:
-Wall— add more warnings for incorrect (and likely to crash) code-g— emit debug information into the program, so you can debug it easier
valgrind
Valgrind can help find the causes of segmentation faults and memory leaks a lot better than most programmers. Run your program with it to find them.
For example, instead of:
./main
run
valgrind ./main
Installing
Check your repos.
Reading Valgrind’s output
After running valgrind, you might get output like:
==30038== Memcheck, a memory error detector
==30038== Copyright (C) 2002-2017, and GNU GPL'd, by Julian Seward et al.
==30038== Using Valgrind-3.13.0 and LibVEX; rerun with -h for copyright info
==30038== Command: ./a.out
==30038==
==30038== Invalid read of size 1
==30038==    at 0x108611: main (main.c:3)
==30038==  Address 0x0 is not stack'd, malloc'd or (recently) free'd
==30038==
==30038==
==30038== Process terminating with default action of signal 11 (SIGSEGV): dumping core
==30038==  Access not within mapped region at address 0x0
==30038==    at 0x108611: main (main.c:3)
==30038==  If you believe this happened as a result of a stack
==30038==  overflow in your program's main thread (unlikely but
==30038==  possible), you can try to increase the size of the
==30038==  main thread stack using the --main-stacksize= flag.
==30038==  The main thread stack size used in this run was 8388608.
==30038==
==30038== HEAP SUMMARY:
==30038==     in use at exit: 0 bytes in 0 blocks
==30038==   total heap usage: 0 allocs, 0 frees, 0 bytes allocated
==30038==
==30038== All heap blocks were freed -- no leaks are possible
==30038==
==30038== For counts of detected and suppressed errors, rerun with: -v
==30038== ERROR SUMMARY: 1 errors from 1 contexts (suppressed: 0 from 0)
[1]    30038 segmentation fault (core dumped)  valgrind ./a.out
This may look difficult to read, but the important part is the middle section:
==30038== Invalid read of size 1
==30038==    at 0x108611: main (main.c:3)
==30038==  Address 0x0 is not stack'd, malloc'd or (recently) free'd
Let’s break this down line-by-line.
Invalid read of size 1
The error in your program is that it tried to read one byte from memory in a way that was invalid.
The only common one-byte type is a char, so we can be pretty sure that it was that.
at 0x108611: main (main.c:3)
You can ignore 0x108611 — it’s the memory address the code was at.
If it’s the only piece of information present, you might’ve tried to call a string as a function or something similar.
Otherwise, the other two pieces of information are much more useful.
We know that it’s in the main function, specifically at line 3 of main.c.
If a line number isn’t present, compile your program with -g and run it again.
Address 0x0 is not stack'd, malloc'd or (recently) free'd
From this, we know that the memory address we couldn’t read from was 0x0.
Since this is NULL, we know that we’re trying to read from a null pointer.
not stack'd, malloc'd or (recently) free'd tells us that this pointer is neither a stack nor a heap pointer, which is obviously true for NULL.
NASM
NASM is an assembler that is often preferred to GAS (the assembler taught directly in class).
It uses the more intuitive Intel syntax rather than the AT&T syntax used by GAS, and is versatile enough to have your entire attacklab payload be created from a single assembly file, rather than needing to stich together a bunch of printf calls with cat.
Intel vs. AT&T Syntax
C version:
int main(void) {
	int n = 20;
	while(n != 1) {
		if(n % 2 == 0) {
			n = n / 2;
		} else {
			n = 3 * n + 1;
		}
	}
	return n - 1;
}
GAS/AT&T Syntax version:
main:
	movl $20, %eax               # int n = 20;
	jmp .test                    # while(n != 1) {
.loop:
	testl $1, %eax
	jz .if_true                  #   if(n % 2 == 0)
.if_true:                            #   {
    shrl $1, %eax                    #     n = n / 2;
	jmp .test                    #   }
.if_false:                           #   else {
	leal 1(%rax, %rax, 2), %eax  #     n = 3 * n + 1;
.test:                               #   }
	cmpl $1, %eax
	jne .loop                    # }
.end:
	dec %eax                     # return n - 1;
	ret
Intel Syntax version:
main:
	mov eax, 20                ; int n = 20;
	jmp .test                  ; while(n != 1) {
.loop:
	test eax, 1
	jz .if_true                ;   if(n % 2 == 0)
.if_true:                          ;   {
	shr eax, 1                 ;     n = n / 2;
	jmp .test                  ;   }
.if_false:                         ;   else {
	lea eax, [eax + 2*eax + 1] ;     n = 3 * n + 1;
.test:                             ;   }
	cmp eax, 1
	jne .loop                  ; }
.end:
	dec eax                    ; return n - 1;
	ret
As you can see, the Intel syntax version is more C-like (n = 20 becomes mov eax, 20), and has less visual noise (20 is obviously a number, you don’t need to call it $20).
This is especially noticeable in the lea instructions corresponding to n = 3 * n + 1:
; Intel
lea eax, [eax + 2*eax + 1]
# AT&T
leal 1(%rax, %rax, 2), %eax
I really have no idea what the person who came up with 1(%rax, %rax, 2) was thinking...
Misc. Tips
Argument Passing Order
The mnemonic to remember is:
- DIane’s
- SIlk
- Dress
- Cost
- 8
- 9
- $
From first to last, these are:
rdirsirdxrcxr8r9- The
$tack
So if we have the code:
int foo(int x, unsigned int y, char* z);

int main(void) {
	foo(1, 2, NULL);
	return 0;
}
This will turn into the assembly:
main:
	; MOVing to a register that starts with e
	; will clear the upper half of the r register
	; that it corresponds to.
	mov edi, 1
	mov esi, 2
	xor edx, edx ; Or `mov edx, 0'
	call foo

	; return 0
	xor eax, eax
	ret